Table of Contents
Installing BioStar on Windows 10
Does BioStar work on Windows 10?
Yes, BioStar works on Windows 10.
However, Microsoft SQL Server 2005 Express included in the BioStar installation package is not compatible with Windows 10, so you need to manually install Microsoft SQL Server 2012.
In the case that you connect to Microsoft SQL Server 2012 using Windows authentication instead of SQL authentication, a separate user account for running the SQL instance service should be created to connect to the SQL Server.
This document demonstrates how to install BioStar on Windows 10 when you connect to the SQL Server using Windows authentication.
Running the BioStar installation package to install BioStar on your PC
1. Insert a BioStar CD into your PC and run the installation file in the Install folder.
- You can also download the installation package from Customer Download Center at the Suprema website (https://www.supremainc.com/en/support/biostar-1-pakage.asp).
2. When the dialog for installing Microsoft SQL Server 2005 shows up, click NO. This dialog only shows up when you have chosen BioStar Express or BioStar Server for the installation type.
3. When you have clicked YES on the dialog, you will see a message box indicating that MS SQL Server 2005 is not compatible with Windows 8, as shown in figures below:


Installing MS SQL Server 2012 Express
1. Go to Microsoft's Download Center at the following URL:
http://www.microsoft.com/en-us/download/details.aspx?id=29062
2. Download the installation package for your operating system. In this document, we will install MS SQL 2012 Database Engine and SQL 2012 Server Management Studio Express.
- For 32-bit Windows 8, download ENU\x86\SQLEXPRWT_x86_ENU.exe
- For 64-bit Windows 8, download ENU\x64\SQLEXPRWT_x64_ENU.exe
3. After completing the download, run the installation package as an administrator privilege and complete the installation.
4. If you encounter any errors during the installation, you can visit Microsoft's support page to solve the issue:
http://support.microsoft.com/?ln=en-us
Running SQL 2012 Express Studio
1. Run SQL 2012 Management Studio.
2. Right-click Databases in Object Explorer. Then, select New Database…

3. Enter BioStar for the Database name field. Click OK.

4. Expand Security and then Logins in Object Explorer. Right-click NT AUTHORITY\SYSTEM and choose Properties, as shown in Figure 3. This brings up the Login Properties dialog. Note that BioStar 1.x Server connects to MS SQL Database Server using the NT AUTHORITY\SYSTEM account.

5. Select Server Roles in the Select a page pane. Check the sysadmin checkbox.

6. Select User Mapping in the Select a page pane.
7. Check the checkbox in the Map column and type “dbo” in the Default Schema field.
8. Check the db_owner checkbox in the bottom pane.

Running DBSetup.exe
1. We've completed the prerequisite configuration to connect to the database server using Windows authentication.
2. Run DBSetup.exe located in the C:\Program Files\BioStar\server folder.
3. Enter the server name in the Database Server field copied from the Server name field of the Connect to Server dialog in SQL Server Management Studio, as shown in figure 6.

Starting BioStar Server and Client
1. Run BioStar Server Config (![]() ) as an administrator privilege.
) as an administrator privilege.
2. Make sure that you've chosen Windows Authentication for the login method and correctly entered the server address in the Database Server field.
3. Click Start to start the server.


4. Run BioStar Client.
5. If you run BioStar Client for the first time, you need to configure the settings of BioStar Server.
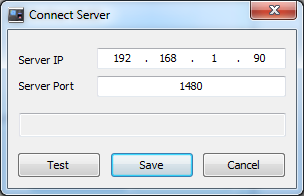
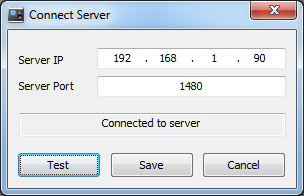
6. Click Server Setting to configure the settings. This brings up the Connect Server dialog.

7. Enter the server IP address specified in BioStar Server Config. Note that you can click Test to see if the server IP address is correct.

8. Click Save to save the current settings.

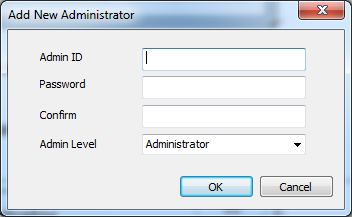
9. Set the ID and password for a new administrator.

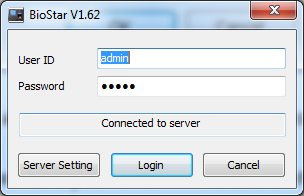
10. Enter the ID and password you've set in the above step.

When you connect the devices to BioStar Server via the Server mode, you should open a port in Windows Firewall.
On the later Windows versions (Windows 7, Windows Server 2012 and Windows 8) than Windows XP, you should add BioStar Client and Server to the list of allowed programs in your Windows firewall.
If you use anti-virus software on your PC, add BioStar Client and Server to the list of allowed programs as well.
- Allowed programs
- BioStar Client (C:\Program Files\BioStar\Console\BioStar.exe)
- BioStar Server (C:\Program Files\BioStar\server\bsserver.exe) - Port: Add port 1480 to Inbound Rules and Outbound Rules in your Windows firewall.