How to Generate Access Control (AC) Report
BioStar 2 version 2.9.3 allows users to generate Access Control (AC) reports.
Access Control (AC) Report provides registered users information in BioStar 2 software, on-site information shown in BioStar 2 software, including event logs, and generates a referable report.
You can find the [Report] Menu at the bottom lefthand side of the menu bar.
Report Menu consists of Saved Reports / User / Event.

- Saved Reports
- If you have a weekly or monthly report that needs to be made and don't want to create individual templates repetitively, you can use the saved reports feature.
- Saved Reports will not save the created report itself. It will only keep the template format. For example, if you want to create a monthly, weekly report on Users in Device, you can set up a template and re-use it with the saved reports feature. You will set up the report template on Monday; on Monday, there were only 50 users on the device; using the same template on Thursday will show the most updated information. If some users were deleted or added after Monday, it would show the most recent result based on the saved template.
- User: User Information
- Select particular users or user groups to generate a report at one glance.
- Column settings include list number, User ID, User Name, Email, User Group, Access Group, Status, Period, Operator Level, Department, Title, and Telephone.
- User: User In Device
- This feature can be handy for those with various numbers of devices at the site, while each device has different users assigned.
- It allows us to see/check users assigned to different devices.
- User: User Detail
- Select certain users or user groups to see their information simultaneously.
- You can select whether to include the user profile image or not.
- User Detail information includes the user group/title/department/email/telephone/status/period/operator level / Login ID / User IP / Access Group
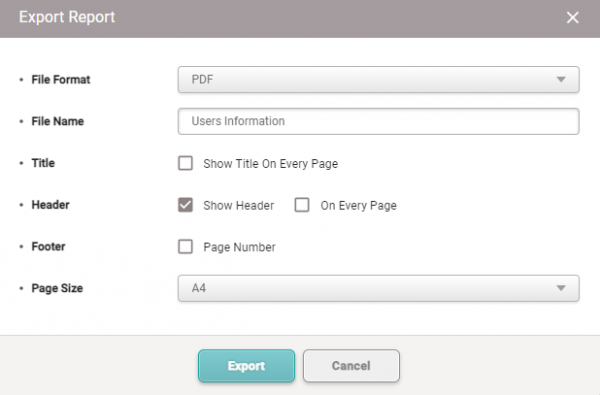
- User Detail Report can be exported in PDF or CSV file format and printed in these formats.
- User: User Photo Gallery
- Select users or user groups to have a photo montage of selected users & user groups.
- User: Users Without Credential
- Let's say you want to find out which users need to add particular credentials; you can select from card/fingerprint / PIN/face to see which one does not have chosen credentials. Credentials can be mutually selected.
- User: Private Auth Mode By User
- Generally, not all users have“Private Auth Mode” set up; in this report menu, you can see those with “Private Auth Mode” activated.
- User: Number Of Credentials By User
- Use this feature when you need a whole report for users with credentials information.
- The report shows if the user has PIN data, the registered number of the card, the number of fingerprints, and the number of faces.
- User: All Cards
- If you want to see all users' card information in BioStar 2, use this menu. You can search from card types CSN/ Wiegand / Secure Credential / Access on Card / CSN Mobile / Wiegand Mobile/ QR / BioStar 2 QR.
- The search can be set up only to show assigned cards or all cards in BioStar 2 software users.
- User: Unassigned Cards
- Cards registered in BioStar 2 software but have not been assigned to a particular user.
- User: Blacklist Cards
- List of blocklist cards in BioStar 2.
- User: Expired Users
- You can set a specific period for each user in BioStar 2 software; when a certain period set for users expires, these users will be shown in this part of the report.
- User: Users To Be Expired Within X Days
- It can be pretty hard to check each user's set period. To make this part more accessible, the users to be expired within X days feature will allow you to see and quickly check those who need alterations in a period setting.
- You can set up x days value. X value can not be less than 0 or greater than 365.
- User: Idle Users For The Last X Months
- The definition of Idle users is those who have not authenticated with devices connected to BioStar 2 software in the device menu. No authentication process on access control devices for X months will be Idle Users.
- If you would like to see particular users that show no recent authentication record, please use this feature to stay updated.
- X value can not be less than one or greater than 60.
- User: Inactive Users
- Allows you to keep track of those who once had access to this particular BioStar 2 software and now no longer have access to it.
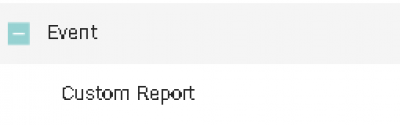
- Event: Custom Report
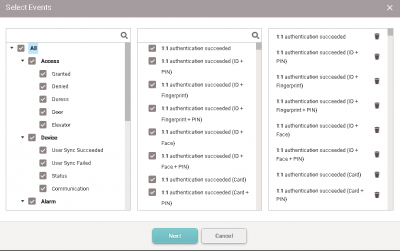
- Custom Report lets you customize reports based on your selection of events. As an example, if you prioritize zone status and would like to get a report solely focused on this matter, then you can go to the zone category and select APB, Scheduled Lock/Unlock, Intrusion Alarm, Interlock, Muster, Occupancy Limit.
- Custom Report has below events to be selected from
- ※Access
- - Granted
- - Denied
- - Duress
- - Door
- - Elevator
- ※Device
- - User Sync Succeeded
- - User Sync Failed
- - Status
- - Communication
- ※Alarm
- - Alarm
- - Alarm Cleared
- - Input
- - Relay
- - Tamper
- - Action
- ※Zone
- - APB
- - Scheduled Lock/Unlock
- - Intrusion Alarm
- - Interlock, Muster
- - Occupancy Limit
- ※Video
- - Video
- Each report page has Save Report / Export / Print / Column Setting.

- Column Setting: includes list number, User ID, User Name, Email, User Group, Access Group, Status, Period, Operator Level, Department, Title, and Telephone.
- Save Report: Save the selected users or user groups template with the column setting data.
- Export: You can export the report in PDF or CSV format.
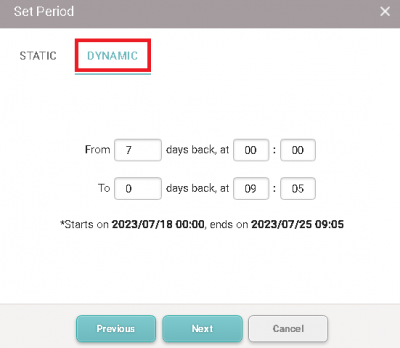
You can configure a schedule to automatically generate custom reports created by setting the DYNAMIC period. Biostar 2 Admin Login is required to use Automatic Report Schedule.
To generate the report automatically, you must make the DYNAMIC type report and save the report.
1. Make DYNAMIC report
1-1. Go To REPORT>Event>Custom Report.
1-2. Select Events when you confirm it.
1-3. Choose [DYNAMIC] and select a specific period.
1-4. Set Filters and set Columns properly.
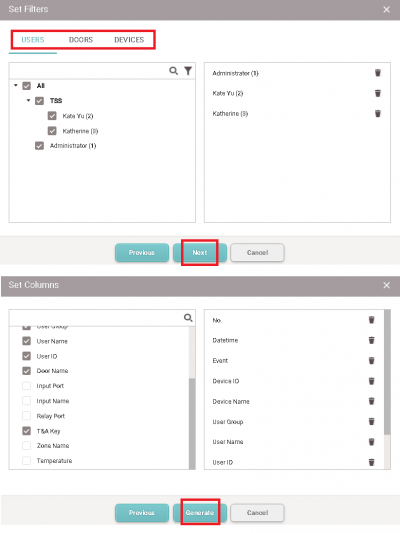
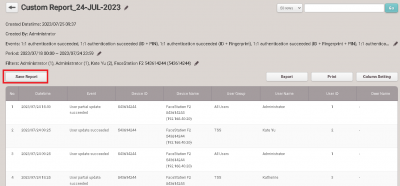
1-5. Confirm the report content, and click [Save Report] to save the filtered Dynamic Report so that you can load the report information to [Automatic Schedule]. This is important to move to the next step.
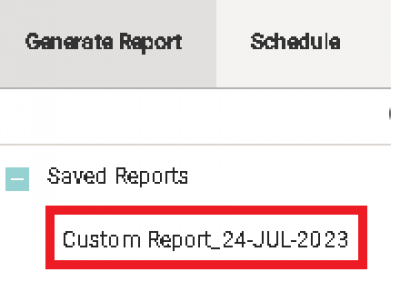
1-6. You can confirm the saved report from Saved Reports as follows.
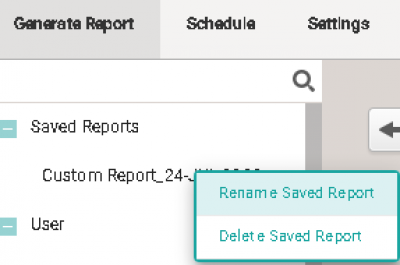
1-7 Rename the saved report if you would like to change the report title of the automatically generated report.
2. Configure the file location and the login information of BioStar 2.
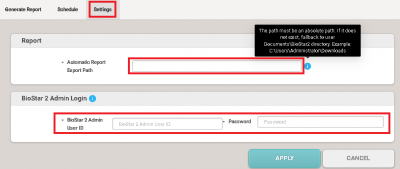
2-1. Click [Settings].
2-2. Update the Automatic Report Export Path manually.
2-3. Enter the BioStar 2 Admin Login information under the BioStar 2 Admin User ID and Password.
- If not entered, it is created in “Documents\BioStar2” of the user's PC.
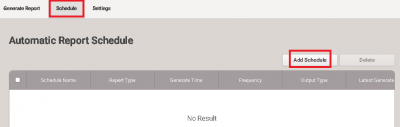
3. Configure Automatic Report Schedule and Format.
3-1. Click on [Schedule] on the top menu bar of REPORT.
3-2. Click [Add Schedule] to update the Automatic Report Configuration.
 3-3. Choose the saved custom report from steps 1-6 and set the Frequency| Daily with Generate Time.
- Weekly or Monthly is not supported.
3-3. Choose the saved custom report from steps 1-6 and set the Frequency| Daily with Generate Time.
- Weekly or Monthly is not supported.
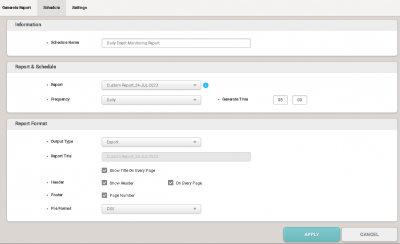 3-4. Confirm the list.

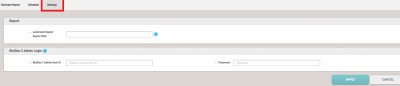 In BioStar 2 → Report → Setting
In order to create a customized automatic scheduled report, in setting you must set up [Automatic Report Export Path] and also set up [BioStar 2 Admin Login]
If you do not plan on using a customized automatic scheduled report, you do not have to fill in the data and set it up.
In BioStar 2 → Report → Setting
In order to create a customized automatic scheduled report, in setting you must set up [Automatic Report Export Path] and also set up [BioStar 2 Admin Login]
If you do not plan on using a customized automatic scheduled report, you do not have to fill in the data and set it up.

1. Does the REPORT feature support the custom field of the user information in BioStar 2?
▶ Unfortunately, it does not support the user custom field in the Report.
2. What is the maximum period setting supported for the report feature?
▶ You can configure one year period from the start date time to the end date time.
3. When will the automatic report schedule's regular report type be supported?
▶ There is no scheduled plan for this. Please get in touch with the Suprema Sales team or Suprema Local Distributor for further inquiry.