Table of Contents
How to Use the 'Backup & Restore' Feature with BioStar 2
From v.2.9.3 of BioStar 2, the function “Backup & Restore” has been introduced newly.
Thanks to this new function, users can back up the necessary data on BioStar 2 more easily and conveniently.
Background
Until v.2.9.2, or lower versions, users needed to manually backup the necessary files, such as a database or enckey file, to prepare for any unexpected problems. However, this must be done manually, which may be cumbersome, and there is potential for issues during the backup, such as missing some mandatory files.
- If the MSSQL database and BioStar 2 are installed on different PCs, BioStar 2 System Backup and Restore CANNOT be used.
- If BioStar 2 version at the time of the backup is different from the current version, the restoration will not proceed.
Summary
1. Backup:
Users can back up the necessary data automatically and regularly by using the new function SYSTEM BACKUP in the Settings of BioStar 2.
![]()
1) Database
- AC
- TA
- VIDEO
2) Folders
- cert
- lic
- util - The path in reference to “system.conf.”
- imagelog
- upload (located in C:\Program Files\BioStar 2(x64)\nginx\html) → This folder will be only included in backup data if there is any file. The file is generated only if you set the Graphic Map View in MONITORING of BioStar 2.
- conf (located in C:\Program Files\BioStar 2(x64)\nginx)
- records (located in C:\Program Files\BioStar 2(x64)\ve)
- db (C:\Program Files\BioStar 2(x64)\ve)
3) CONF files
- setting.conf
- system.conf
- server_url.conf
- log.conf
- sysbackup.conf
2. Restore:
Users can restore the backup data by using an extra application named biostar-restore located at C:\Program Files\BioStar 2(x64).
![]()
Major Features
1. Set the cycle for backup of the data
Users can back up the files in BioStar 2 automatically and periodically according to the selected option in Frequency of Automatic System Backup.

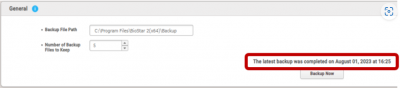
- Not Use: If selecting this option, the data will not be backed up regularly and automatically. Instead, you can back up the data by clicking the “Backup Now” in “General.”
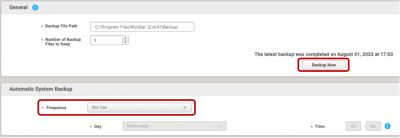
- Daily: If selecting it, the data will be backed up at the set time daily

- Weekly: If selecting it, the data will be backed up at the set time and day weekly

- Monthly: If selecting it, the data will be backed up at the set time and date monthly


- Example)

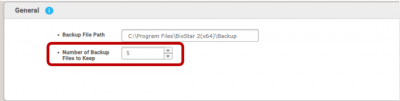
2. Set the number of files to keep
Users can define the maximum number of backup files to keep by setting “Number of Backup Files to Keep” in the General section of BioStar 2. Once a specific number is set, the oldest backup data will be deleted when the number of backup files exceeds this limit.
- Example)

3. Use the extra application to restore
Restoring the data is processed through the extra tool named “biostar-restore.” The tool will be automatically installed when installing BioStar 2 v.2.9.3 and located in C:\Program Files\BioStar 2(x64).
Since the specific tool for data restoration is separate from BioStar 2, users can attempt to restore data when BioStar 2 isn't running normally due to configuration problems or database issues.
4. Restorable depending on the backup data version
If the backup data was generated using a version lower than the current one, it cannot be restored through this new function.
Example)
If the backup data is generated in v.2.9.3, it CANNOT be restored in v.2.9.4 or a higher version of BioStar 2.
Precautions
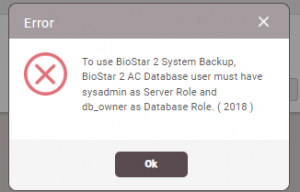
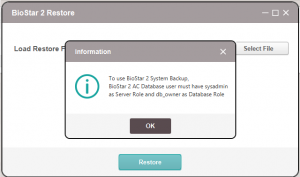
In the case of using MSSQL, you will meet the two types of warning popups below and CANNOT each function normally if you don't assign the sysadmin of the Server Role to the database user.
If you are in the above case, please check first if the sysadmin has already been assigned to the user.

- Error Case 1.
- Error Case 2.


Execution Procedure
Step 1. Backup (based on the case of using the function manually)
Step 1-1.
Go to SYSTEM BACKUP in Settings after logging into BioStar 2

Step 1-2.
Click Backup Now

Step 1-3.
Go to C:\Program Files\BioStar 2(x64)\Backupgenerated correctly and check if the file is the correct one generated when you tried to make it.

Step 2. Restore
Step 2-1.
Run the application named biostar-restore located at C:\Program Files\BioStar 2(x64)

Step 2-2.
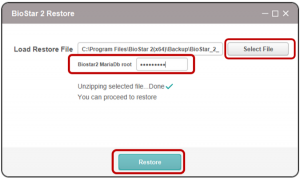
- 1) If using Maria DB,
Select the file and apply it after clicking the Select File button. Then, put the root password on your Maria DB and click the Restore button.
- 2) If using MSSQL,
Select the file and apply it after clicking the Select File button. Then, click the Restore button.


Step 2-3.
Then, you will see an additional popup appear below. Then, click Yes.

Step 2-4.
Finally, the restoration is completed normally if you see the popup below.
However, please note that the popup does not disappear even when the restoration is completed normally.

Step 2-5.
You must log into BioStar 2 again once the restoration has been completed. After logging into BioStar 2, please check whether the restoration has been completed normally.